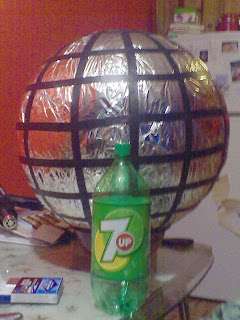
Just some final touches to go.
The texture isn't AS smooth as I'd like it to be, and the camera really picked up an all of the imperfections it has.
Quick rundown of the process:
Supplies: 2 rolls electric tape, 3 emergency blankets (only used one, better more than not enough), scissors, tailors tape, exacto blade, exercise ball, photoshop, 37" TV screen...how lucky.
First, I did a google search on how to make juggling balls and softies and stumbled across this blog that gave me all the info I needed for working out the dimensions . ( see diagram/pic)
.
My exercise ball was 62" circumference, so I did the math (even though ti hurt a little, but no pain no gain) and worked out a basic pattern ( which I've provided here....click to download if you'd like it, but keep in mind it's for a 62" circumference ball....modify as needed, your mileage may vary.) and put it together in Photoshop.

After transferring this pattern to a piece of freezer paper (traced from the screen), then to vinyl, I went about cutting the 6 pieces I needed. NOTE: Cutting emergency blankets is easy provided you have sharp scissors and keep the material taught. Scissors just glide through it.
Now, lining up the end points with the top and bottom of the ball, I used electric tape(easiest to pull off and not tear the emergency blanket material, not to mention provides the contrasting texture I needed) to adhere it to the ball.
Using my heat gun I heated the material up and smoothed it down. Don't get too close or you'll melt the material. Also, the ball precautions mention not putting it in temperature ranges above 32c (which a heat gun surely exceeds). After smoothing down one section, I let the ball cool by a fan before starting the next section. Though I'm sure you could do this with a hairdryer, it would take a bit more time.
Go slowly and carefully. This is not a hard project, but can mess up fast. I have the option of
Keep in mind: This is only my alpha test of production, but I'm happy with the results for what I needed to make. Also, I cut the pieces a little larger than I thought as I never really trust my math, but turns out my math was dad on.
After you've got the 6 pieces taped on and smoothed down with heat, go ahead and put another line of tape in the middle of the sections you've just done to make it look as if there are more panels.
Then using the lines on the ball as a guide, start taping longitudinally ( I hope you know what I mean) to make more sections.
Go over it again with the heat gun to smooth it out, and you're pretty much done.
A couple notes about the process:
Be in a well ventilated area. The fumes from melting plasticy material could be dangerous, I dunno, but I was beside a window with a fan to extract the fumes and cool the ball and material off as I went.
Take your time. This is pretty important. You can get into a groove where you think you know how the material will react, but all it takes is a small little piece to overheat when the phone rings or the cat starts meowing and you're screwed for a perfect finish.
Put the ball in a large mixing bowl or something like that.Think *egg cup*. It keeps it from rolling around and getting away from you when you're working.
I'll take some pics of it when the stage set is complete and let you see it in it's final role. I intend to set this on a record player and let it spin from a platform about low-desk height.


