Fun Quote I saw online

"I'm not saying she's fat, but if I had to name the 5 fattest people I knew, she'd be 3 of them."

The Town Clock

Headpiece made for Natassha N for the Mz Gay Halifax Pageant.

Town Clock of Halifax located on Citadel Hill


Headpiece made on my kitchen counter 
(with artificial turf lined shrug on the body form in the left background)


And mounted on Natassha's head

The entire set was made for under $20, including paint, glue sticks and materials.
The clock is constructed out of salvaged foamcore (a seating chart for a charity event held by the Nova Scotia Mental Foundation), wooden dowels from the dollar store, a ping pong ball, a cat toy painted white and an old plastic bowl covered in water activated packing tape and given a faux copper finish.
The shrug is made froma hula hoop, artificial turf, glue stick and a couple toy cars from Value Village.
Total amount of materials: $18.50.  Total amount of  time building the set: Approximately 24 hours (including drying time).

Dragon Trophy Update #7 (Almost there....)

First shots of the nearly complete dragon!!! He's not entirely complete, as I still have to do his eyes, seal him, and may be going at him with an airbrush for a bit to get the shading I want.


I'm not entirely sure I'm loving the green version, he looks a little first generation GODZILLA for me.But green is a good one to start with.
It really was my first  run at a prop like this, so taking that into consideration, I think he turned out great. I'm already planing the build of the next one.
The one thing I have to say is that I learned a lot through making this one, mostly through mistakes and things that didn't think about for the process.
For example:
  • Teeth: They will be made of something better than salt dough and will be installed LOOONG before I paint the mouth and  tongue. The teeth got in the way, though only the lower ones were installed, and made maneuvering the brushes almost impossible.
  • Jaw: I should have made this separate and attached it later. As I applied more mache and material, the jaw line started to blend a little too much with the neck and he came out looking a bit stocikier than planned.
  • Skin Texture: Was a bit rougher than I had hoped it would look....next one I'll move towards a smoother appearance and paint on a texture rather than try to make my own. This skin texture however would excel in another piece, something like a Stone/Dirt Monster or a Warty look.
Final pics tomorrow or the next day when the paint has dried and I've finished him off!

Dragon Trophy Update #6

Finally had the time to put the last bit of skin on the dragon, but due to the reliable old dampness that is Dartmouth, I gotta wait for the damn stuff to dry.
Though I have to say that having this much done really makes me feel good and I'm realy looking forward to the paint job ahead me.

Dragon Trophy Update #5

Life goes on, but mostly gets in the way of the REALLY important stuff, like making a dragon.
So I added the top row of teeth.....
Then added the tongue, and put a rough paint job down for the inside of the mouth...
Then added the fins to the sides of the neck (bent wire, grocery bags, glue gun and a heat gun...ooooo I love my tools)....
Wrapped the horns with fabric soaked with paper mache/glue mixture and added some texture with paper clay....

Now, it will dry untill I can make some more paper clay with the new method I found online. When you finish boiling the paper and blending it with a multitude of kitchen tools, you put it in a pillow case and tie off the end, then throw it in the dryer. The end result is paper fibres that have 'pilled' like a sweater, only about 3 lbs of it at a time. This provides a bumpy, pebble like texture that I'm using for a monster skin sort of look. The pictures don't reflect it yet, but will show more when painted.


Keep you updated!!

Posters in the last 2 weeks...

 Trash-o-rama:Last minute poster pulled from my ass.....the poster reflects this.

Easter Show; Equally fast as the Trash-o-rama poster, but let's face it, it is a Ham Holiday. I do have to say that bending the logos around the eggs was done completely without any tutorials, it was something i figured out during my work day that actually WORKED OUT!


Victoria Day weekend Appreciation BBQ poster:Linda and her husand Gerry have been hosting this for years, so I figured it was time to out them on a poster. We have a BBQ and Rummoli tournament all on Victoria Day Weekend. So I photoshopped her face onto the Queens face and aded card and a spatula.

The Duchess' Bird Watching Perch

After seeing this post on design spongethis post on cut out and keep, and yet another on Threadbanger, I was inspired to make one of these for the cats.

Ever since the spring started, the birds have returned to our area and our cats couldn't be happier. It's like Kitty Cable out the windows of our house.
The only problem is that our front doors are a solid panel of aluminum a thrid of the way up, and our cats are not, so they've been finding creative ways to look out the window, including sitting on my laptop and pressing every key and messing it up a bit.
When I came home from my parents at Christmas, I had more than I came with and used an old suicase they wanted to be rid of to carry my gifts home. i of course had immediate repurpose for this case the second I touched it.
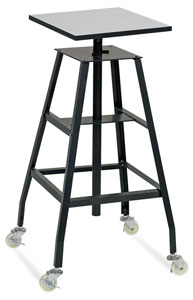
Using all the instructions from the post on design sponge, I whipped this together in less than 10 minutes. The  hardware ended up costing me around $9 with taxes (bought the exact same ones in her post from Home Depot). The legs came from a table I liberated from the Salvation Army Thrift Shop for a mere $3 (the top of the table has been epoxied to a lazy susan to make a sculpture stand, much like the image below, minus the legs/stand so that I can access all side of my paper mahce sculptures when forming or painting.). 

The funniest part is that it took longer to clean the suitcase than it did to actually finish the mounting of the hardware and putting the legs in. We now have a space to store all the toys and other cat things off the coffee table with the interior pockets and under the pillow-blanket thing.

To keep the lid from closing down on them, there is a piece of hollow aluminum tube (formerly part of an aluminum arrow shaft) on the interior edge of the hinges. I'm looking at a hook and catch system instead (the kind of bent nail and eye hook idea) but I can't seem to find one in brass to match the suitcase hardware.
Additionally, a proper pillow would be a great improvement. I searched through my fabirc stash tring to find something with an appropriate colour or weight, but found nothing. I'm sure I'll find a t-shirt the right colour and just stitch that up and fill it with some cotton batting I have.